
微風湖「奇蹟」熱動力免電風扇 民國6年(1917)使用手冊,作者:威廉·J·H·斯特朗
- 2023年7月16日
- 讀畢需時 31 分鐘
已更新:2月23日
1917 Lake Breeze "The Wonder" Heat-Powered Non-Electric Fan Directions by Wm. J. H. Strong
微風湖「奇蹟」熱動力免電風扇 民國6年(1917)使用手冊,作者:威廉·J·H·斯特朗《Black Water Museum Collections | 黑水博物館館藏》
1. 基本資料
文物名稱:微風湖「奇蹟」熱動力免電風扇 民國6年(1917)使用手冊
英文名稱:1917 Lake Breeze "The Wonder" Heat-Powered Non-Electric Fan Directions
出版年份:民國6年(1917)
出版單位:Wm. J. H. Strong (美國微風湖馬達公司 Lake Breeze Motor Company)
作者:威廉·J·H·斯特朗 (Wm. J. H. Strong)
生產國家:美國 (Made in U. S. A.)
館藏單位:黑水博物館 (Black Water Museum)
2. 藏品說明
本藏品為一份發行於民國6年(1917)的早期熱動力免電風扇(Heat-Powered Fan / Stirling Fan)使用手冊。在二十世紀初期,電力網路尚未普及至所有城鄉,此類透過燃燒外部燃料產生熱能,進而驅動史特林引擎(Stirling Engine)運作的風扇,是當時歐美家庭對抗炎熱氣候的頂級高科技民生家用機械。
這份手冊不僅是一本單純的產品說明書,更是一部詳盡的風扇操作與保養指南。手冊內文結構嚴謹,配有多幅機械剖面圖,鉅細靡遺地說明了A型(Model A)與B型(Model B)風扇的操作程序。
【雙型號系統與燃料多樣性】
Model A(A型):設計較為輕巧,提供12吋與16吋兩種扇葉尺寸。其結構專為單一性質的清潔燃料設計,僅能使用酒精(Alcohol)或瓦斯(Gas)驅動。
Model B(B型):屬於大型多功能款式,提供16吋與21吋兩種大型扇葉。B型風扇的底座設計較為複雜,配有可互換的燃燒器系統(包含底部卡扣與頂部彈簧卡夾)。使用者可根據當地取得的能源,自由切換使用煤油(Kerosene)、酒精、汽油(Gasoline)或瓦斯。因其結構龐大,B型風扇出廠時一律採「拆解散裝(Knocked down)」形式由貨運寄送,使用者須依照手冊指示,由上至下依序組裝氣缸法蘭、保持器與輔助腳環。
【保養規定】
手冊中對機械的潤滑與清潔有著嚴格的規定,這反映了史特林引擎對氣缸密合度與溫度的要求:
「每天僅限一滴油」的黃金法則:手冊警告,活塞與柱塞桿每天只能滴入「不超過一滴」乾淨的輕質潤滑油(One drop a day only)。若潤滑過度,多餘的機油會流入氣缸底部,在高溫下變質、產生異味,甚至破壞氣缸內部必須保持絕對乾燥(Parched surface)的狀態,阻礙活塞的順暢運作,導致馬達降速甚至完全卡死。
積油的排除法:若不慎加了太多油,手冊指示的唯一解決方法是「完全拆解機殼」。使用者必須小心翼翼地用力拔出密合度極高的活塞(此時會感受到明顯的真空吸力),並將氣缸底端直接放在火焰上反覆烘烤,直到氣缸頂端「不再冒出白煙」為止,藉此將殘存的機油徹底燒乾。手冊特別註明「僅用汽油清洗是不夠的」,且安裝時連布料上的微小棉絮都可能導致故障。
專利可調式滾柱軸承:手冊特別介紹了其獲得專利的嶄新軸承設計,並附帶專屬的微型鎖緊螺帽扳手與螺絲起子。手冊指示動力軸承(Roller bearing 1)必須保持比其他軸承更緊的狀態,且絕對禁止在未鬆開螺帽的情況下強行拆卸,以免刮傷轉輪。
【各類燃料的專屬操作工藝】
煤油燈(Kerosene Lamp):配有專屬的玻璃燈罩(Chimneys)。手冊詳細解釋了「毛細現象(Capillary attraction)」:若不使用時未將燈芯降至最低,輕質油會揮發,留下重質油導致下次點燃時產生惡臭。此外,手冊嚴禁使用剪刀修剪燈芯,必須使用紙張以「逆時針畫圓」的方式擦拭頂部碳化層。
汽油噴燈(Gasoline Burner):這是一個微型的加壓系統。使用者必須先在螺紋塗上棕色肥皂以確保氣密,接著使用隨附的打氣筒注入「微量氣壓(僅限打一下)」。點火前,需先用浸滿酒精的石棉火炬(Asbestos torch)預熱燃燒管,待管身夠熱後才能打開閥門點燃本生燈。底座更配有可360度轉動的金屬線手柄,用於隨時疏通極細的噴嘴孔。
瓦斯燃燒器(Gas Burner):手冊教導使用者利用一面小鏡子平放在管線下方,藉由反射來觀察火焰形狀。標準的火焰必須呈現「帶有明顯尖端的圓錐狀」,且高度不得超過 1/2 吋,尖端必須剛剛好觸碰至黃銅氣缸底部,展現了極致的熱傳導計算。
3. 技術規格
本手冊第16頁保存了民國6年(1917)原廠發布的珍貴運轉數據與規格,這些數據是在出廠標準下測試得出(瓦斯測試基準為:芝加哥城市煤氣,每1000立方英呎含660熱量單位,壓力4盎司)。
【尺寸規格 (Dimensions)】
A型 (12吋扇葉):全高 20 吋,最大直徑 13 吋。
A型 (16吋扇葉):全高 22 吋,最大直徑 18 吋。
B型 (16吋扇葉):全高 41 吋,最大直徑 18 吋。(落地型高度)
B型 (21吋扇葉):全高 44 吋,最大直徑 23 吋。(落地型高度)
【風扇轉速效能 (RPM Speeds)】
不同燃料提供的熱值不同,直接影響了機械動能的轉換效率:
瓦斯 (Gas):效能最高。12吋可達 550 RPM;16吋可達 485 RPM;21吋為 325 RPM。
酒精 (Alcohol):效能次之。12吋可達 500 RPM;16吋可達 400 RPM;21吋為 275 RPM。
汽油 (Gasoline):16吋可達 450 RPM;21吋為 300 RPM。
煤油 (Kerosene):效能最低。16吋為 400 RPM;21吋為 250 RPM。
【燃料消耗與續航力 (Fuel Consumption & Runtime)】
酒精 / 汽油:加滿一次燃料槽,皆可持續運轉高達 20 小時。
煤油:加滿一次燃料槽,實際可運轉 8 至 10 小時。
瓦斯消耗:一般城市煤氣每小時約消耗 1.2 立方英呎;高熱值的天然氣或品茨氣(Pintsch gas)每小時消耗不超過 0.5 立方英呎。
【民國6年(1917)美國運轉成本估算 (Cost of Operation)】
煤油:每加侖 15 美分 ➔ 每小時成本 1/8 美分 (最廉價)。
瓦斯:每千立方英呎 80 美分 ➔ 每小時成本 1/6 美分。
汽油:每加侖 25 美分 ➔ 每小時成本 1/5 美分。
酒精:每加侖 85 美分 ➔ 每小時成本 1/2 美分 (最昂貴,因高額稅金)。
4. 發展歷史
熱空氣引擎(Hot Air Engine)最早由蘇格蘭牧師羅伯特·史特林(Robert Stirling)於嘉慶21年(1816)發明,故又稱史特林引擎。其原理是透過外部熱源對封閉氣缸內的空氣進行加熱,空氣受熱膨脹推動活塞作功,接著空氣移至冷卻區收縮,活塞回歸原位,藉由溫差的熱循環產生持續的機械動能。
在19世紀末至20世紀初期(約光緒16年(1890)至民國9年(1920)),這項技術迎來了民用化的黃金時期。當時即使在美國,電力網路也僅限於都會區的核心地帶,廣大的鄉村、農莊、或是未拉電線的市郊住宅,依然處於無電可用的狀態。為了在炎熱的夏季獲得涼爽的微風,製造商將小型的史特林引擎與風扇葉片結合,創造出了「免電風扇」。
早期的熱動力風扇體積龐大且笨重,但隨著材料科學與精密加工技術的進步(如本藏品中強調的專利滾柱軸承、極高密合度的黃銅氣缸),宣統2年(1910)代的免電風扇已經能做到相對輕巧、安靜,且只需極少量的家用燃料(如點燃一盞小煤油燈)就能徹夜運轉,被當時的消費者視為「奇蹟」般的發明。然而,隨著民國9年(1920)代後期美國農村電氣化法案的推動與交流電網的全面普及,插電即用、免去繁瑣添油與點火保養程序的電動風扇迅速佔領市場,這種精巧的熱動力機械便逐漸走入歷史,成為工業革命過渡期的短暫卻璀璨的見證。
5. 製造商沿革
本手冊的作者及版權所有者為 Wm. J. H. Strong(威廉·J·H·斯特朗),他是一位活躍於20世紀初期的美國機械工程師與發明家。斯特朗先生以美國芝加哥為基地,創立了「微風湖馬達公司(Lake Breeze Motor Company)」。
該公司專注於改良並商業化小型的史特林引擎,其最著名的產品線即為「微風湖(Lake Breeze)」系列熱動力風扇。在同時代的競爭對手中,微風湖風扇以其「優雅的造型」、「極佳的運轉靜肅性」以及「多重燃料相容系統」聞名。斯特朗先生深知不同地區的能源取得難易度不同(例如農村易取得煤油,城市則有煤氣管線),因此他獨創了本手冊中記載的「可互換式燃燒器底座(Interchangeable Burners)」,讓同一台 B 型風扇的本體,只要更換下方的夾具與燈具,就能適應各種燃料。
此外,他在機械潤滑系統上的改良(專利可調式滾柱軸承)大幅降低了機械摩擦力,使得微風湖風扇號稱是「史上最高效的同型馬達」,只需極微弱的火焰(每小時燃燒不到1盎司酒精)即可帶動高達21吋的巨大金屬扇葉。雖然微風湖馬達公司最終在電氣化浪潮下消失,但 Wm. J. H. Strong 留下的專利設計與這本使用手冊,至今仍是機械工程發展史上的重要瑰寶。
6. 藏品價值
這份民國6年(1917)的使用手冊在多個層面上具備極高的博物館典藏價值:
科技與工藝史的具體實證:手冊中剖面圖與保養規範(如毛細現象的防治、一滴油法則),生動地保留了百年前純機械時代的工程邏輯。它證明了在電子控制技術出現之前,人類如何單純依靠熱力學定律與金屬加工精度,製造出能全天候穩定運轉的家用機器。
早期美國能源經濟的縮影:手冊第16頁詳列的燃料消耗量與價格表,是研究一次世界大戰期間(民國6年(1917))美國民生能源經濟的第一手史料。數據真實反映了當時煤油作為最廉價普及能源的地位,以及純酒精因高額課稅而成為奢侈燃料的歷史背景。
社會文化與生活型態的紀錄:從手冊文案中強調「在最炎熱的夜晚放置床邊10呎可給您一夜好眠」、「使用瓦斯燃燒器沒有異味」,可以窺見百年前美國中產階級對於提升生活品質、追求居家舒適度的強烈渴望。同時,繁雜的點火、打氣、清碳與注油程序,也展現了當時的消費者對於使用「高科技產品」所需具備的耐心與工匠精神,與現代社會「隨插即用」的消費習慣形成強烈而有趣的對比。
文獻完整性與稀缺性:作為一本超過百年歷史的操作手冊,其內容能完整保存至今,且內頁圖文清晰、版權資訊明確,實屬難得。它是復原與維修現存古董微風湖風扇不可或缺的唯一官方說明,也是黑水博物館極具代表性的工業文獻類藏品。
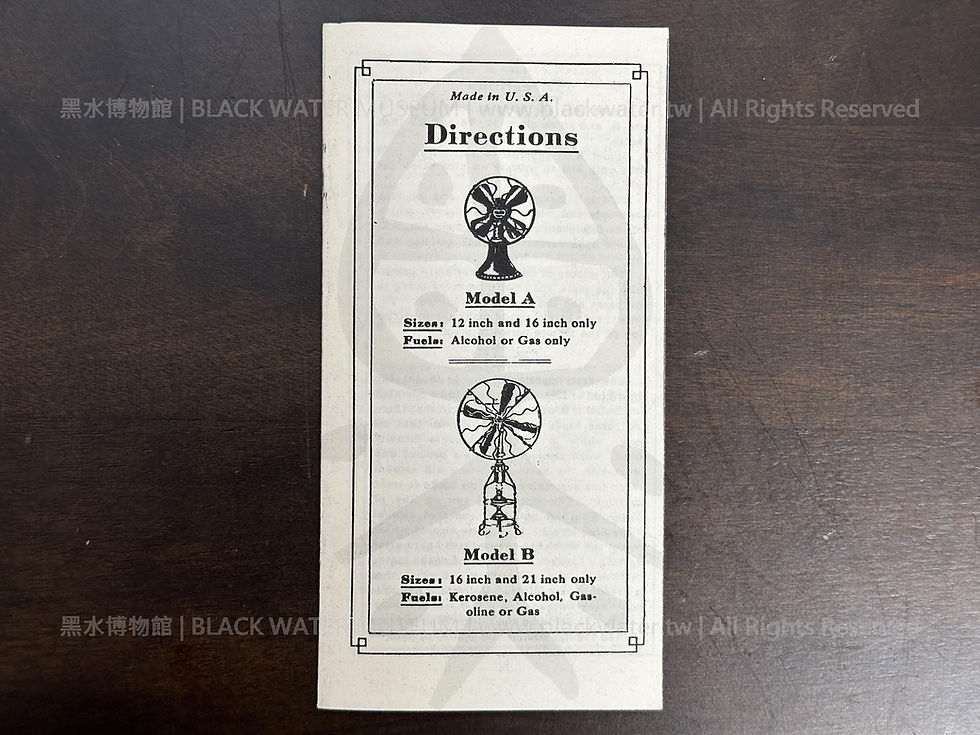
Made in U. S. A.
Directions
Model A
Size: 12 inch and 16 inch only
Fuels: Alcohol or Gas only
Model B
Sizes: 16 inch and 21 inch only
Fuels: Kerosene, Alcohol, Gas- oline or Gas
美國製造
使用說明
A型 尺寸:僅有 12 吋與 16 吋 燃料:僅限酒精或瓦斯
B型 尺寸:僅有 16 吋與 21 吋 燃料:煤油、酒精、汽油或瓦斯

Directions
These fans are made in two models, A and B, and three sizes. 12, 16 and 21 inch blades.
Model A is supplied in 12 and 16 inch sizes only and to operate on alcohol or gas only.
Model B is supplied in 16 and 21 inch sizes only and with suitable burners, which will fit interchangeably in the same fan, will operate upon kerosene, alcohol, gasoline and gas.
The motors of the two models are practi- cally the same, the chief differences being in the bases and the sizes of the blades. The several cuts herein should make the construction of the motors perfectly plain.
Fuel
The first important thing is to get the right kind of fuel. If the fan is to be operated on alcohol it is well to bear in mind that there are three kinds of alcohol: Grain, that is, pure, which is expensive because heavily taxed; wood alcohol, which is a poison; and denatured, the name given to grain alcohol which has something added to make it unfit to drink. The motor will run on any of these. The best grade of denatured alcohol is the kind to use. Do not use alcohol which makes the wick char two or three hours after starting. On such fuel the speed of the motor will be one-third below normal. Such alcohol is probably over-diluted with water or chemi- cals which weaken it as a fuel.
For the kerosene and the gasoline burners use the regular commercial grades of fuel.
The gas burner is adapted for use with city, natural, Pintsch or Blau gas but not for acetylene.
Oiling
Oil the piston and the plunger rod which passes through the piston with not more than one drop of thin, clean oil each day as dirt in the cylinder or too much oil will stop the engine. The roller bearings may be oiled as freely as necessary but require little oil. No surplus oil from them must be allowed to run down into the cylinder. The piston and the piston stem of the gas fans need a trifle more oil than when the fans are run on other fuels as the gas flame is hotter. Too much oil, however, will get stale and may throw off an unpleasant odor. A bottle of oil with dropping wire attached to the cork is sup- plied free with each fan.
Odor
There is positively no odor of any kind from these fans when they are treated ac- cording to these directions. For the first day or so after the fan is started there is a "new" smell like that of a new stove when it is first used but this soon wears away as the iron and the enamel become thoroughly baked and the fan becomes seasoned.
Speed
These motors run faster on a small amount of fuel burned in the open air than any motor heretofore built. In other words they are the most efficient motors of the type ever constructed. Please bear this in mind. Speed is a question of fuel. These fans can be made to run faster but they would require so much fuel as to render them impracticable. Used according to these directions and within the range of their power, they give
使用說明
這些風扇分為 A 與 B 兩種型號,以及三種尺寸:12、16 與 21 吋扇葉。
A 型僅提供 12 吋與 16 吋尺寸,並且僅能使用酒精或瓦斯運作。 B 型僅提供 16 吋與 21 吋尺寸,並配有合適的燃燒器(可在同一風扇上互換使用),能使用煤油、酒精、汽油與瓦斯運作。
這兩款型號的馬達構造幾乎完全相同,主要差異在於底座與扇葉尺寸。本說明書中的幾張插圖應能讓馬達的構造一目了然。
燃料 (Fuel)
首要之務是取得正確種類的燃料。如果風扇要使用酒精運作,請務必記住酒精分為三種:穀物酒精(即純酒精),因課稅重而價格昂貴;木精(甲醇),具有毒性;以及變性酒精,這是在穀物酒精中加入其他物質使其不適合飲用而得名。馬達使用這三種酒精皆可運轉,但最適合使用的是最高等級的變性酒精。請勿使用會在啟動兩三小時後使燈芯碳化的酒精。使用此類不良燃料,馬達轉速會比正常情況低三分之一;這類酒精可能過度摻水,或添加了削弱其燃燒效能的化學物質。
煤油與汽油燃燒器請使用一般市售等級的燃料。
瓦斯燃燒器適用於城市煤氣、天然氣、Pintsch 煤氣(品茨氣)或 Blau 煤氣(藍煤氣),但不適用於乙炔。
上油潤滑 (Oiling)
活塞及穿過活塞的柱塞桿(plunger rod)每天請滴入不超過一滴乾淨的輕質潤滑油,因為氣缸內的髒污或過多的油會導致引擎停止運轉。滾柱軸承可視需要隨時上油,但所需油量極少。絕不能讓軸承多餘的油流進氣缸內。由於瓦斯火焰溫度較高,相較於使用其他燃料,瓦斯風扇的活塞與活塞桿需要稍微多一點的油。然而,過多的油會變質,並可能散發出難聞的氣味。每台風扇皆免費附贈一瓶機油,其軟木塞上附有滴油金屬線。
氣味 (Odor)
只要依照本說明操作,這些風扇絕對不會產生任何異味。在風扇初次啟動後的第一天左右,會有一種「新」的味道,就像新爐具剛使用時一樣;但隨著鑄鐵與琺瑯被徹底烘烤,且風扇完成磨合後,這種味道很快就會消失。
轉速 (Speed)
這些馬達在開放空間中僅需燃燒少量燃料,其運轉速度就比以往製造的任何馬達都還要快。換言之,它們是史上所製造過最高效的同類型馬達。請記住這一點:轉速是取決於燃料的問題。這些風扇確實可以運轉得更快,但這會需要消耗極大量的燃料,導致其失去實用性。只要依照本說明並在其動力範圍內使用,它們就能提供⋯⋯

universal satisfaction to reasonable and in- telligent people. Our claim is: Placed 6 or 8 feet from you they will keep you work- ingly comfortable in sultry weather and 10 or 12 feet from your bed will give you restful slumber in the hottest nights. It is remark- able that they run as they do on the small quantity of fuel used.
In case these directions have not been carefully observed, and there is a noticeable slowing down of the motor it may be found due to one or more of the following reasons:
One or more of the bearings are too tight. Superfluous oil below the piston.
Foul wick.
A low grade of fuel, lacking proper heat units.
A lack of piston lubrication.
The inside of the cylinder below the piston must positively be free from oil to get the best speed. A parched surface gives the best results. The piston and the cylinder may look dry from above but still the lower inside walls be coated with oil from previous super- fluous oiling. The directions call for one drop of oil at a time on the piston stem and the piston and it is important not to use more. It is also advisable not to oil the roller bearings too freely for superfluous oil there might run down into the cylinder.
Too much oil in the cylinder can be remedied only by taking the motor apart and thoroughly cleaning and drying out the inside of the cylinder by heating the lower end of the cylinder over the flame. Tie a string tightly around the throat of the casing and then unscrew the four brass screws holding the casing to the cylinder. This will permit the separation of the entire mechanism from the cylinder but one will have to pull hard enough to overcome the vacuum caused by the closeness of the fit of the piston in the cylinder. The string holds all the upper parts together so that they can be put back into the cylinder again easily. The piston fits so closely in the cylinder that even fine lint from a cloth will prevent free action so in replacing the cylinder do not use force to crowd it in except enough to overcome the pressure of the air in the cylinder. Heat applied under the cylinder when the piston is thus removed will dry out the oil and the heat should be left on till no smoke comes. out of the upper end of the cylinder. Washing with gasoline is not enough. Re-oil before starting the motor again.
A foul wick will not permit the fuel to feed freely and therefore the heat of the flame is reduced and the motor will not operate because of a lack of sufficient heat. The remedy for this is to cut off the charred sec- tion of the wick, or if the wick is too old, to use a new one. When the trouble arises from a low grade of alcohol it is hard to remedy as the local dealer who sells the alcohol is usually not to blame. For the most part the alcohol supplied, however, is of a sufficiently good grade.
The natural inclination of the user of the motor is to flood the piston with oil and that. is why we have so carefully emphasized the small amount to be used. Do not neglect, however, to oil the motor once a day as plainly stated for if it gets too dry the friction will slow the speed. In the use of the gas burner the flame must not be burned too high as the heat of this flame is very intense. Should the blades refuse to move it is due to the piston sticking in the cylinder from lack of oil. Gas is so much hotter than the other fuels that it dries out the oil faster. There should only be one person who does the oiling, for if everybody puts in a drop a day there will too much oil accumulate.
(接續前文) ⋯⋯普遍能讓講理且明智的使用者感到滿意。我們的訴求是:在悶熱的天氣裡,將它放置在距離您 6 到 8 呎(約 1.8 到 2.4 公尺)處,能讓您在工作時保持舒適涼爽;在最炎熱的夜晚,將它放在距離床鋪 10 到 12 呎(約 3 到 3.6 公尺)處,能給您一夜好眠。令人驚嘆的是,它們僅需消耗極少量的燃料就能發揮如此效能。
故障排除與保養 (Troubleshooting & Maintenance)
如果未仔細遵守上述說明,且發現馬達有明顯減速的現象,可能是由以下一個或多個原因造成:
一個或多個軸承鎖得過緊。
活塞下方有過多(多餘的)潤滑油。
燈芯污濁或碳化。
燃料等級過低,缺乏足夠的熱值。
活塞缺乏潤滑。
氣缸內部的乾燥與清潔 活塞下方的氣缸內部必須絕對保持無油狀態,才能達到最佳轉速。乾燥的表面能帶來最好的運轉效果。活塞與氣缸從上方看起來可能很乾燥,但下方內壁可能仍附著著先前過度添加的機油。說明書明確要求每次在活塞桿與活塞上只能滴「一滴」油,切勿使用過量,這點非常重要。此外,也建議不要在滾柱軸承上添加過多潤滑油,以免多餘的油往下流進氣缸內。
清除積油的拆解步驟 氣缸內積油過多的唯一解決方法,是拆解馬達,並將氣缸底端放在火焰上加熱,以徹底清潔並烘乾氣缸內部。
請在機殼頸部緊緊綁上一條線。
轉下將機殼固定在氣缸上的四顆黃銅螺絲。這能讓整個機械結構與氣缸分離。
您需要稍微用力拉,以克服活塞與氣缸緊密貼合所產生的真空吸力。(綁線的作用是將所有上半部零件固定在一起,以便之後能輕鬆裝回。)
將活塞拆下後,在氣缸下方加熱以烘乾機油,請持續加熱直到氣缸頂端不再冒煙為止(僅用汽油清洗是不夠的)。
在裝回氣缸時,因為活塞與氣缸密合度極高,即便是布料上的細微棉絮都會阻礙其順暢運作。除了施加足以抵抗氣缸內氣壓的力量外,切勿使用蠻力硬塞。
在重新啟動馬達前,請記得再次上油。
燈芯與燃料 污濁的燈芯會阻礙燃料順暢供應,導致火焰溫度降低,馬達會因缺乏足夠熱能而無法運作。解決方法是剪掉燈芯碳化的部分;若燈芯太舊,請直接換新。如果問題出在低等級的酒精,這通常很難解決,因為販售酒精的當地經銷商通常也不知情。不過,市面上供應的酒精大多具有足夠良好的品質。
上油的黃金法則 馬達使用者的直覺往往是給活塞加滿油,這就是為什麼我們如此謹慎地強調只能使用極少量的原因。然而,也請不要疏忽說明書上明確指示的「每天上油一次」,因為如果過於乾燥,摩擦力會使轉速變慢。
使用瓦斯燃燒器時,火焰不可調得太高,因為其溫度非常劇烈。如果扇葉完全無法轉動,那是因為缺乏潤滑油導致活塞卡在氣缸內。瓦斯的溫度比其他燃料高得多,因此烘乾機油的速度也更快。
最後,請務必指定一位專人負責上油。如果每個人每天都去滴一滴,油量很快就會累積過多而導致故障。


This adjustable roller bearing is very ingenious, entirely new and is patented.
If the bearings need adjustment loosen the locknut with the little locknut wrench sup- plied free with each motor. The head of the screw should be held by the screw driver, also supplied free with each motor, while the locknut is being loosened. After the lock- nut is loose the screw may be turned by the screw driver. After the adjustment is made tighten up the locknut again. Roller bear- ing (1) is the power bearing. It performs the heaviest duty and should be kept slightly tighter than the others. Whether the bear- ings need tightening can be judged by the sound of the motor in operation and by its speed, or by the looseness of the bearings to the touch.
Never take the bearings off from the crank shaft without first loosening the locknut and taking out the screw as otherwise the face of the wheels may be seriously marred.
Model A
To start the Model A alcohol motor, grasp with one hand the handle at the top of the fan and tip or rock the fan back on the rear edge of the base, at the same time pressing together the two thumb holds at the bottom edge of base. The fuel tank will drop out. Remove the cap, unscrew the wick holder and fill the tank nearly full of alcohol. Never attempt to use in the alcohol tank any other kind of fuel than alcohol. Adjust the wick so it stands not more than one-sixteenth of an inch above the edge of the wick tube. The total height of the flame itself should not be over one and one-half inches at the most. A flame larger than this wastes fuel. The flame. of the proper size burns less than one ounce. of alcohol an hour and the motor should run at least 24 hours on one filling of the fuel tank. Set the fan back over the fuel tank and it will automatically be locked back in place. After the flame has been applied for a few moments, a slight twist of the brass pulley at the end of the shaft opposite the blades will set the fan in motion. Should the piston stick, due perhaps to dried oil or to dust getting into the oylinder, take off the top of the casing and gently tap the piston with a piece of wood. There is no water about the motor and nothing to freeze.
When the fan is to be stopped, lift it up in the manner previously explained, put out the flame and cover it at once with the cap, and keep the wick covered thus when not in use. as otherwise the wick will gum up and may burn with a slight odor. The vent hole, either gauze or a small tube close to the wick tube, should always be kept clean. In clean- ing the gauze use a small soft brush and do not break out the gauze. If you see the vent is not fully open, or if the gauze becomes the least damaged, send in for a new wick tube. Never let the flame burn when the fan blades are not in motion.
專利軸承調整 (Adjustable Roller Bearing)
這款可調式滾柱軸承的設計非常巧妙、完全是嶄新的,並且已獲得專利。
調整方法:如果軸承需要調整,請使用每台馬達免費附贈的小型鎖緊螺帽扳手鬆開鎖緊螺帽。在鬆開鎖緊螺帽時,應使用同樣免費附贈的螺絲起子固定住螺絲頭部。鎖緊螺帽鬆開後,即可用螺絲起子轉動螺絲進行調整。調整完畢後,請再次將鎖緊螺帽鎖緊。
鬆緊度判斷:滾柱軸承 (1) 是動力軸承(power bearing)。它承受著最繁重的運作負荷,因此應保持比其他軸承稍微緊一些。至於軸承是否需要鎖緊,您可以透過馬達運作時的聲音與轉速,或是用手觸摸軸承的鬆緊度來判斷。
⚠️ 警告:切勿在未先鬆開鎖緊螺帽並取出螺絲的情況下,就將軸承從曲軸(crank shaft)上硬拆下來,否則可能會嚴重損傷飛輪表面的外觀。
微風湖「奇蹟」A型 熱動力免電風扇 操作指南
1. 添加燃料與調整燈芯
若要啟動微風湖「奇蹟」A型 熱動力免電風扇(酒精馬達),請用單手握住風扇頂部的把手,將風扇向底座後緣傾斜或搖晃,同時將底座底緣的兩個拇指卡扣壓在一起,燃料槽就會掉出。
取下蓋子,旋下燈芯座,並將燃料槽幾乎注滿酒精。切勿嘗試在酒精槽中使用酒精以外的任何燃料。
調整燈芯,使其高出燈芯管邊緣不超過 1/16 吋。
火焰本身的總高度最多不應超過 1.5 吋。過大的火焰只會浪費燃料。
適當大小的火焰每小時燃燒不到 1 盎司的酒精,加滿一次燃料槽,風扇應能運轉至少 24 小時。
2. 啟動風扇
將風扇放回燃料槽上方,它就會自動鎖回原位。點火燃燒片刻後,輕輕扭轉與扇葉反方向之軸端上的黃銅軸(brass pulley),就能讓風扇開始運轉。
如果活塞卡住(可能是因為機油乾涸或灰塵跑進氣缸),請拆下機殼上蓋,並用一塊木頭輕輕敲擊活塞。
馬達內部沒有使用水,因此沒有任何會結冰的零件。
3. 停止與清潔保養
當需要停止風扇時,請依照前述方式將其抬起,熄滅火焰並立刻蓋上蓋子。不使用時請務必保持燈芯被蓋住的狀態,否則燈芯上的燃料會黏結成膠狀(gum up),下次燃燒時可能會產生輕微異味。
靠近燈芯管的通氣孔(無論是金屬網狀或小管狀)應始終保持清潔。
清潔金屬網時請使用小型軟毛刷,切勿弄破金屬網。如果您發現通氣孔未完全暢通,或者金屬網有絲毫損壞,請送修以更換新的燈芯管。
⚠️ 絕對守則:當風扇扇葉靜止不動時,絕對不要讓火焰持續燃燒。

To light Model A when used as a gas burn- er it is only necessary to turn on the gas and to hold a match at the lower end of the flutes in the base.
The burner will light without lifting the fan.
Model B
This Model is always shipped "knocked down," by express or freight only, and must be assembled. To assemble the Model B Fan attach the upper end of the legs to the flange of the cylinder first. Then insert the screws which hold the retainer; then the higher ring, and finally the last or lower ring which holds the auxiliary feet. The stand will go together easily in this manner, but on the contrary if you begin to put it together at the lower end first it will be more difficult to in- sert the screws at the cylinder end.
As you will see there are two kinds of clasps: one is at the bottom of the stand and holds interchangeably the gasoline, gas and kerosene burners; longer spring clasps are attached to the ring near the top and hold the alcohol burner. If the fan is not used as an alcohol burner, of course, the springs are omitted.
With the alcohol or the gasoline burner it is necessary to use the extension sleeve which is put upon the lower end of the re- tainer, or that part to which the legs are at- tached and which encircles the lower end of the cylinder. This sleeve protects the flame from the air currents and prevents the dilu- tion of the heat so that the fan will operate more rapidly with the use of the sleeve than if it is omitted.
Kerosene Lamp
In using the kerosene lamp loosen the ad- justable lamp brackets at the lower ring of the base stand by turning the small wing nuts, insert the lamp already lighted, tighten the wing nuts and it will be held solidly in place. The lamp should not be left burning with the blades stopped. To put the lamp out turn the wick down as far as possible by turning the knurled thumb screw or other wick elevating or lowering device on the side of the top of the lamp bowl.
微風湖「奇蹟」A型:瓦斯燃燒器點火方式
當 A 型風扇作為瓦斯燃燒器使用時,點火非常簡單。只需打開瓦斯,並將火柴靠近底座凹槽(flutes)的底端即可。無需抬起風扇即可點燃燃燒器。
微風湖「奇蹟」B型 熱動力免電風扇 組裝與操作指南 (Model B)
此型號一律以「拆解散裝(knocked down)」的狀態透過快遞或貨運寄送,因此必須由使用者自行組裝。
1. 腳架組裝順序
第一步:請先將支腳的上端連接到氣缸的法蘭(flange)上。
第二步:鎖上固定保持器(retainer)的螺絲。
第三步:裝上較高的圓環。
第四步:最後裝上帶有輔助腳的最後一個(較低的)圓環。
按照這個由上而下的順序,腳架很容易就能組裝起來;相反地,如果您從底端開始組裝,要鎖上氣缸端的螺絲將會變得非常困難。
2. 燃燒器卡扣說明
如您所見,風扇配有兩種卡扣:
底部卡扣:位於腳架底部,可用來互換固定汽油、瓦斯與煤油燃燒器。
頂部彈簧卡扣:較長的彈簧卡扣安裝在靠近頂部的圓環上,專門用來固定酒精燃燒器。當然,如果您不打算將風扇作為酒精燃燒器使用,就不需要安裝這些彈簧。
3. 延長套筒的使用 (Extension Sleeve)
使用酒精或汽油燃燒器時,必須使用延長套筒。 請將其安裝在保持器的底端(即連接支腳並環繞氣缸底部的那個部件)。這個套筒能保護火焰免受氣流干擾,並防止熱能散失;因此,裝上套筒會比不裝時讓風扇運轉得更快速。
煤油燈操作指南 (Kerosene Lamp)
安裝與固定:使用煤油燈時,請先轉動小翼形螺帽(wing nuts,即蝶形螺帽),鬆開底座底環上的可調式燈架。將已經點燃的煤油燈放入後,再將翼形螺帽鎖緊,就能將燈具牢牢固定。
熄滅方式:若要熄滅燈火,請轉動燈碗頂部側面的滾花拇指螺絲(knurled thumb screw)或其他升降燈芯的裝置,將燈芯盡可能調到最低。
⚠️ 絕對守則:與前述規範相同,當風扇扇葉靜止不動時,絕對不應讓煤油燈繼續燃燒。

The kerosene lamp will not throw off the slightest odor if properly cared for. After filling be very sure to wipe off the font care- fully with a dry cloth. Let the wick remain turned down as far as possible. Start the flame low and after the lamp has been burn- ing awhile the wick may be gradually turned up. If turned too high the lamp will smoke. When putting the flame out turn the wick down as far as possible. Never attempt to trim the wick by cutting. When it needs trimming take out the spreader from the cen- ter of the wick, turn up the wick a trifle and with a circular motion from right to left, in ether words opposite to the motion of the hands of a clock, wipe off the top edge of the wick with a piece of paper. If the wick is left up when the lamp is not in use the oil creeps up by capillary attraction and the more volatile portions evaporate leaving the heavier oil and it is this oil residue which makes the lamp smell, but if the wick is kept turned completely down, as directed when the lamp is not in use and the surplus oil wiped off after filling, the lamp will burn without odor. As before stated when the fan is new there is a slight odor for a day or two until the iron and the paint become thoroughly baked.
Chimneys
The kerosene lamp requires a special chimney. Nothing must be placed around the lamp, which will reflect the heat back on it or impede the circulation of air, as the hotter the lamp gets the faster the oil will flow in the wick and the lamp will smoke. Two chimneys and two extra wicks are supplied free with each lamp.
Black chimneys can be supplied if desired. for night use. They must be handled care- fully as they are somewhat fragile and they do not allow the flame to be turned high or the heat will be reflected on the burner and the lamp will smoke.
煤油燈防異味與燈芯保養指南
只要保養得當,煤油燈絕對不會散發出絲毫異味。請特別留意以下幾點:
清潔與火力控制:
添加燃料後,請務必用乾布仔細擦拭油槽(font)。
剛點燃時請保持小火,燃燒一段時間後,再逐漸調高燈芯。如果調得太高,煤油燈會冒黑煙。
熄滅火焰時,請將燈芯盡可能調到最低。平時也請讓燈芯盡可能保持在最低的位置。
正確修整燈芯:
絕對不要嘗試用剪刀修剪燈芯。
當需要修整時,請取出燈芯中央的火焰擴張器(spreader),將燈芯稍微調高,然後用一張紙以「從右到左」的畫圓方式(即逆時針方向),輕輕擦拭燈芯的頂部邊緣。
預防異味的原理:
如果在不使用煤油燈時將燈芯留在高處,煤油會藉由毛細現象向上攀爬,較易揮發的成分會蒸發,留下較重的油脂,正是這些殘留的油脂導致了煤油燈的異味。
反之,如果在不使用時將燈芯完全調低,並在添加燃料後擦淨多餘的油,煤油燈燃燒時就不會有任何味道。
(註:如前所述,當風扇是全新時,會有一兩天產生輕微的氣味,這是因為鑄鐵和油漆正在被徹底烘烤,屬正常現象。)
燈罩 (Chimneys)
煤油燈需要使用專用的玻璃燈罩。
通風與散熱:煤油燈周圍絕對不可放置任何會將熱能反射回去、或阻礙空氣流通的物品。因為燈具的溫度越高,煤油在燈芯中往上抽流的速度就越快,這會導致煤油燈冒黑煙。
隨機配件:每盞燈皆免費附贈兩個燈罩與兩條備用燈芯。
夜間專用黑色燈罩
若有夜間使用的需求,我們也可提供黑色燈罩。
注意事項:使用黑色燈罩時必須非常小心,因為它們相對脆弱。此外,絕對不允許將火焰調高,否則熱能會被黑色燈罩反射回燃燒器上,導致煤油燈冒黑煙。

Gasoline Burner
The Gasoline Burner is a specially made blow torch. The tank will stand a very high pressure, but it operates most successfully on a lower pressure.
It is very important that in screwing the burner tube onto the tank, the screw threads should first be soaped with common brown soap. The soap makes the connection air tight.
To operate, unscrew the outer plug on the side of the tank, fill it nearly full of gasoline, and then screw in the plug so that it is air- tight.
Pe sure to have the valve at the top of
the tank, the one with the long stem, closed tight. To start the burner it is necessary to put
a slight air pressure in the tank and then to
heat the burner tube stem.
To apply the air pressure open the auto- matic air check valve by turning the upper screw plug in the large filler plug on the side. Then put the tip end of the air pump in the air hole, give not more than one small stroke of the pump and then screw up the air valve again. This puts a slight air pressure in the tank.
The asbestos torch is then saturated with alcohol and attached around the tube above the valve. After it has burned a short time the long stem of the valve is opened and if the tube is heated sufficiently and there is not too much air pressure the Bunsen burner will light by a match held at the top of the burner tube. A little experimenting with this will indicate to you its method of opera- tion. After the gasoline burner has been An air pump, running a short time one or two more strokes of the air pump are necessary. a torch and a wrench are supplied free with each gasoline burner.
If the burner orifice plugs up turn in either direction the wire handle of the tip cleaner at the base of the burner tube. This operates the tip cleaner which keeps the very fine burner hole clean. This is made clear by the cut herein..
Alcohol Tank
The manner in which the alcohol font is used in Model A fans is shown in the cuts. The alcohol tank for Model B is inserted in the upper removable springs, or clips, which hold it solidly in place. These springs are of tempered steel and are not supplied with the Model B fan unless the alcohol font is ordered. The Model B alcohol tank also requires a flame protector not necessary for the Model A.
Keep the wick covered with the cap when the fan is not in use.
Gas Burner
The cut indicates how the gas burner is used with Model A fans.
The gas burner for Model B is inserted on the lower clamps and to light it the match is placed where the gas tube enters the re- tainer, If you wish to see the flame hold a small looking glass just below where the tube enters the retainer, with the glass flat and facing up. The flame will be clearly reflected in the glass and if the air holes at the base of the burner are properly open you will note that it makes a cone shape with a decided point. This cone should not be more than 1/2 inch high and the point of the cone should just touch the bottom of the brass cylinder.
The slit near the air holes at the bottom of the burner tube. which admits the gas, is adjusted before leaving the factory for Chi- cago city gas containing 660 heat units. per 1000 cubic feet and at 4 ounce pressure.
汽油燃燒器 (Gasoline Burner)
汽油燃燒器是一種特製的噴燈(blow torch)。雖然燃料槽能承受極高的壓力,但在較低壓力下運作效果最佳。
氣密處理:非常重要的一點是,將燃燒管旋入燃料槽時,螺紋必須先塗上一般的棕色肥皂(brown soap)。肥皂能確保接合處達到完全氣密。
添加燃料:操作時,轉開燃料槽側面的外塞,將汽油幾乎注滿,然後將塞子旋緊以確保氣密。請務必將燃料槽頂部帶有長桿的閥門緊緊關閉。
啟動與點火步驟: 要啟動燃燒器,必須先在燃料槽內打入微量氣壓,然後加熱燃燒管的管身。
加壓:轉開側面大注油塞上的上方螺絲塞,以打開自動單向氣閥。接著,將打氣筒的前端對準氣孔,最多只能打氣一下(one small stroke),然後再次鎖緊氣閥。這樣就能在槽內產生微量氣壓。
預熱:將石棉火炬(asbestos torch)浸透酒精,並安裝在閥門上方的管子周圍點燃。
點火:燃燒一小段時間後,打開閥門的長桿;如果管子已經加熱得夠充分,且氣壓沒有太高,只要將火柴移到燃燒管頂端,就能點燃本生燈(Bunsen burner)。稍微嘗試幾次,您就能掌握操作訣竅。
後續加壓:汽油燃燒器運作一小段時間後,可能需要再用打氣筒打一兩下氣。 (註:每組汽油燃燒器皆免費附贈一個打氣筒、一個火炬與一把扳手。)
噴嘴清潔: 如果燃燒器噴嘴堵塞,請朝任意方向轉動燃燒管底部的噴嘴清潔器(tip cleaner)金屬線手柄。這會啟動清潔器,保持極細的燃燒孔暢通(本說明書中的插圖有清楚標示此構造)。
酒精槽 (Alcohol Tank)
安裝差異:微風湖「奇蹟」A 型風扇使用酒精油槽的方式如插圖所示。B 型風扇的酒精槽則是插入上方可拆卸的彈簧(或卡夾)中,以將其牢牢固定。這些彈簧由回火鋼製成;除非您有訂購酒精油槽,否則 B 型風扇不會隨附此彈簧。
防風罩:此外,B 型酒精槽還需要配備一個防風罩(flame protector),這在 A 型上是不需要的。
⚠️ 注意:當風扇不使用時,請務必蓋上蓋子以保護燈芯。
瓦斯燃燒器 (Gas Burner)
插圖顯示了 A 型風扇如何使用瓦斯燃燒器。B 型風扇的瓦斯燃燒器則安裝在下方的夾具上。
點火與觀察:點火時,請將火柴放在瓦斯管進入保持器(retainer)的位置。如果您想觀察火焰,可以在管子進入保持器的正下方拿一面小鏡子,讓鏡面平放朝上。
火焰標準:火焰會清晰地反射在鏡子裡;如果燃燒器底部的氣孔開啟得當,您會看到火焰呈現帶有明顯尖端的圓錐狀。這個圓錐體的高度不應超過 1/2 吋,且其尖端應剛好接觸到黃銅氣缸的底部。
出廠設定:燃燒管底部靠近氣孔、讓瓦斯進入的狹縫,在出廠前已針對芝加哥城市煤氣(Chicago city gas)進行了標準調整(該標準為:每 1000 立方英呎含 660 熱量單位,壓力為 4 盎司)。

Speeds of Models A and B
Fuel | 12-in. | 16-in. | 21-in. |
Kerosene | 400 | 250 | |
Alcohol | 500 | 400 | 275 |
Gasolene | 450 | 300 | |
Gas | 550 | 485 | 325 |
Cost of Operation
The kerosene burner will run practically 8 to 10 hours with one filling, and the gaso-line and the alcohol 20 hours each. The city gas consumed is about 1.2 cu. ft. per hour. Natural gas, Pintsch and Blau are much richer in heat units than the usual city gas and therefore not over 1/2 cu. ft. per hour is required.
The cost of operation upon the different fuels in the United States is as follows:
Kerosene: 1/8¢ per hour (@ 15¢ per gallon)
Gasoline: 1/5¢ per hour (@ 25¢ per gallon)
Alcohol: 1/2¢ per hour (@ 85¢ per gallon)
Gas: 1/6¢ per hour (@ 80¢ per M ft.)
Dimensions
Model | Size | Height | Greatest Diameter |
A | 12-inch | 20 | 13 |
A | 16-inch | 22 | 18 |
B | 16-inch | 41 | 18 |
B | 21-inch | 44 | 23 |
Copyright, 1917, by Wm. J. H. Strong. 16 -
A 型與 B 型的轉速
燃料 | 12 吋 | 16 吋 | 21 吋 |
煤油 | 400 | 250 | |
酒精 | 500 | 400 | 275 |
汽油 | 450 | 300 | |
瓦斯 | 550 | 485 | 325 |
運作成本
煤油燃燒器加滿一次燃料實際可運作 8 到 10 小時,而汽油和酒精則各可運作 20 小時。城市瓦斯的消耗量約為每小時 1.2 立方英尺。天然氣、Pintsch 瓦斯和 Blau 瓦斯所含的熱量單位比一般的城市瓦斯豐富得多,因此每小時的用量不超過 1/2 立方英尺。
在美國,使用不同燃料的運作成本如下:
煤油: 每小時 1/8 分(@ 每加侖 15 分)
汽油: 每小時 1/5 分(@ 每加侖 25 分)
酒精: 每小時 1/2 分(@ 每加侖 85 分)
瓦斯: 每小時 1/6 分(@ 每千立方英尺 80 分)
尺寸
型號 | 尺寸 | 高度 | 最大直徑 |
A | 12 吋 | 20 | 13 |
A | 16 吋 | 22 | 18 |
B | 16 吋 | 41 | 18 |
B | 21 吋 | 44 | 23 |
版權所有,1917 年,Wm. J. H. Strong。 16 -


留言